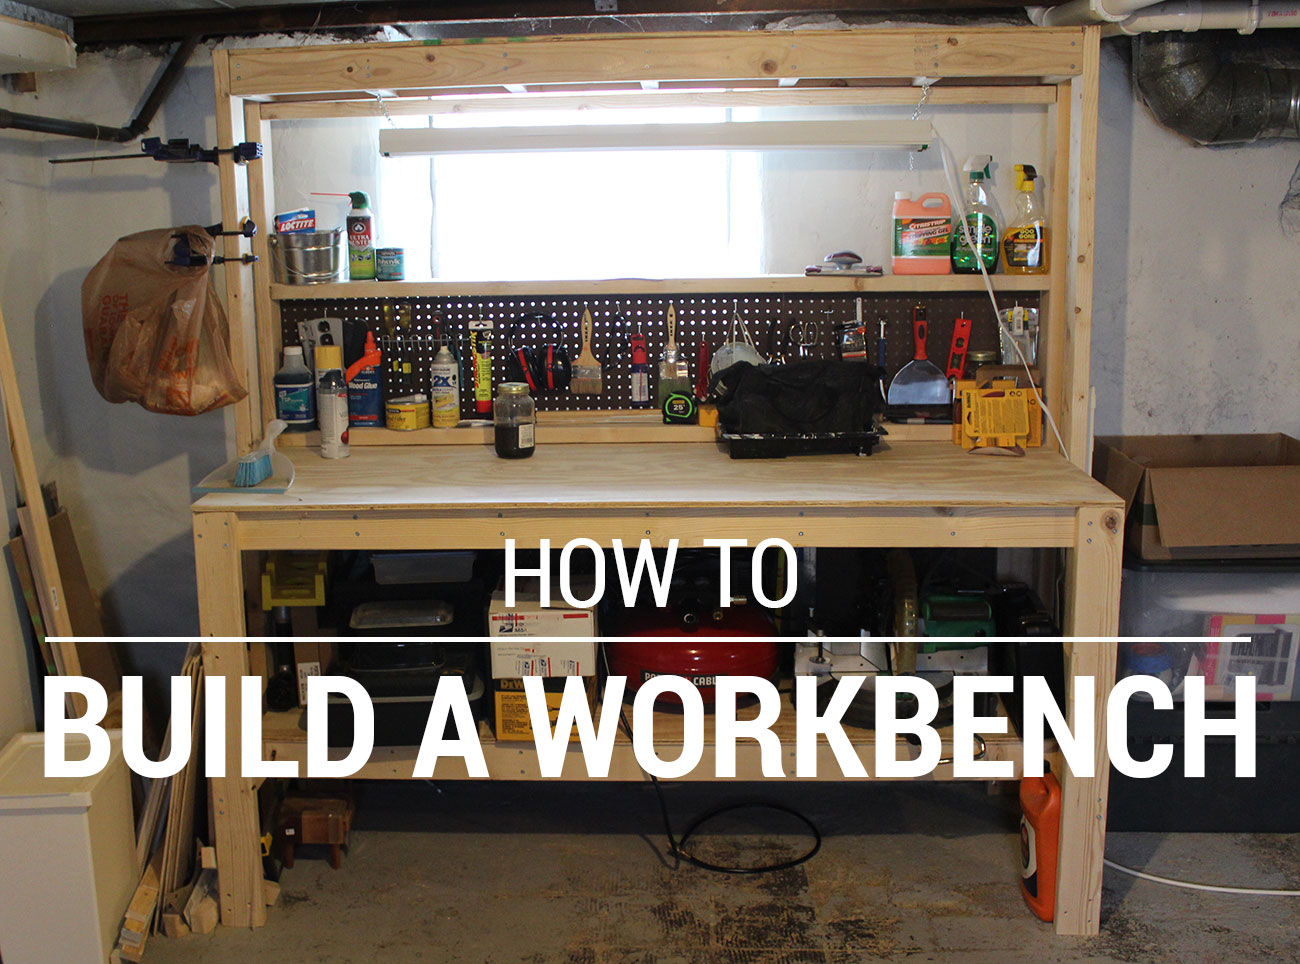
One of the nice things about moving to Rochester is that I’m now living in a house rather than living in an apartment. More specifically, a house with a very large and spacious basement.
So much room for activities!
Throughout the months, I’ve found that having a big basement in and of itself isn’t necessarily useful. You need some infrastructure to help reign in all of the STUFF (hanging onto the STUFF is a conversation for another time).
Part of our strategy to keep our stuff organized has been to install a number of shelving units around the perimeter of the basement. Shelving units are only good for so many things though. With all of the DIYing we have done in the past few months, we’ve acquired a number of different tools. One way that we’ve reigned in the tools and other DIY accoutrements is to build ourselves our very own workbench. I did a bit of research to figure out how to build a workbench that fit our needs, but was also soft on the budget.
Preparing to Build
Preparing to build is the fun part! That is, if you like doing research, figuring out what your needs are and then designing. As I set out to build my workbench, I did a few things: a) I reviewed as much material as I could on the subject and b) I tried to plan ahead as much as I could.
Speaking from experience, getting it wrong on the first try sucks. Failing to plan or not following the plan can result in extra work, added cost or even injury. Be careful, attentive and plan along the way.
Some of the resources I used to learn about building a workbench can be found below:
- How to Pick Materials for a Workbench (This Old House): In a short video, Tom Silva shares things to look for when purchasing materials to build a workbench.
- How to Build a Simple Workbench (This Old House) – In Scene 2 of this video, Tom Silva walks us through the process of building a simple workbench.
- How to Build a Workbench: Super Simple $50 Bench (Family Handyman): Step-by-step tutorial for building a workbench.
Obviously, this is just the start. Be sure to do all of your own research and planning before embarking on a project like this. To design and build my bench, I used the Family Handyman article above. I did some different things with the optional accessories, but the bulk of my work relied on the steps and diagrams described there.
What You’ll Need to Build a Workbench
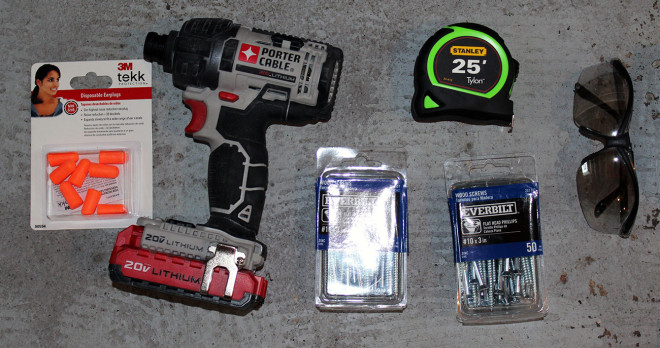
Things You’ll Need
- Impact driver
or drill
- 4′ x 8′ Plywood (3/4″ thick BC grade pine)
- 15 – 2x4s (kiln-dried as straight as you can find them; without excessive defects and knots)
- Ear plugs or hearing protection earmuffs
- Tape measure
- Pencil or similar marking tool
- 3″ #8 wood screws
- 1.5″ #8 wood screws
- Countersink drill bit
- Random orbital sander
- 80
, 150
and 220
grit sand paper for sander
Things That Will Make the Process Easier, but Aren’t Necessary
- Compound Miter Saw
- Table Saw
- Clamps
- Patience (a lot of it)
Optional Items To Pimp Out Your Bench
- Shop Light
- Power Strip
- Peg Board
Sourcing Tools
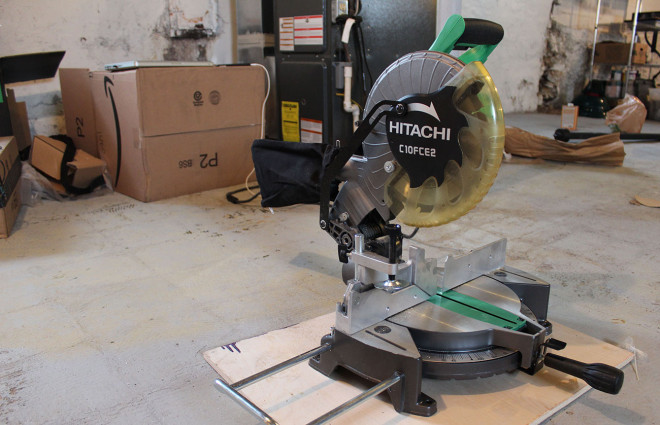
The major tools that I used to complete this project were a power driver and a compound miter saw. I left ripping the plywood sheet up to the good folks at my home improvement store.
If you don’t have a compound miter saw or any other tool that is conducive to cutting 2x4s, you can see if the home improvement store will cut them for you. One word of caution is that the folks at the home improvement store *might* not be as exact in their measurements as you would like or need them to be. If you want to do it yourself but you don’t have a saw or want to purchase one, see if you have any friends or family that has a saw that you can borrow.
I opted to purchase a saw, since I knew that it would be a good investment in the future. It certainly added to the overall cost of this specific project, but since it’s such a versatile tool I now have it for other things that I work on.
Safety First!
I’d be remiss if I did not mention safety. Always use eye protection and ear protection when working with power tools and saws. Always know how to properly use your tools. Have a first-aid kit at the ready. Be prepared in case you experience an emergency. Keep all pets and children away from the area when you are working or when sharp or dangerous tools are out.
Building the Workbench
1. Gather and prepare all tools and supplies

Before I started, I purchased and gathered all of the materials that I would need. Note that I had my sheet of plywood cut for me at the home improvement store. Make sure you remove all pets from the area before starting the actual work part of the project.
—
2. Measure and mark all of your 2x4s
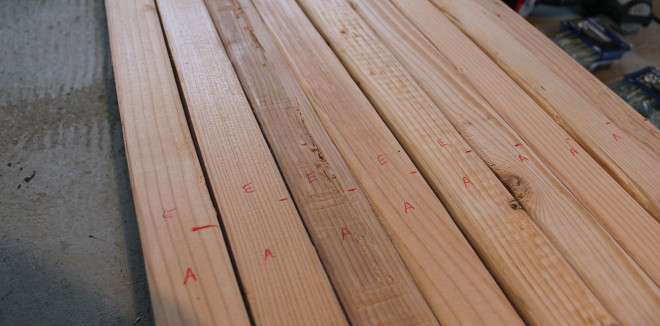
Prior to cutting, I followed the cut list and marked all of my 2x4s with their corresponding letters.
—
3. Cut all of your 2x4s
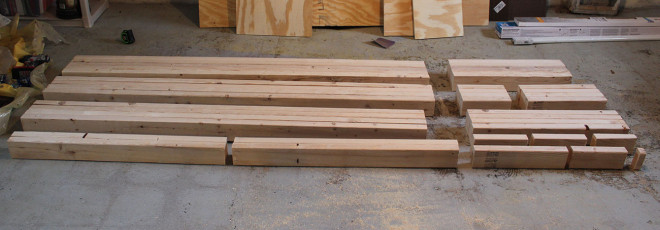
Next comes the fun part: cutting all of the 2x4s! There are a lot of cuts and this task can become tedious, so make sure you stay alert and on target for all of the cuts. It’s also important to make sure that pieces that are supposed to be the same length are cut at the same length. I used the previously cut pieces to help me line up the saw to where it needed to be and that seemed to help a lot.
—
4. Clamp together the pieces before starting to drill
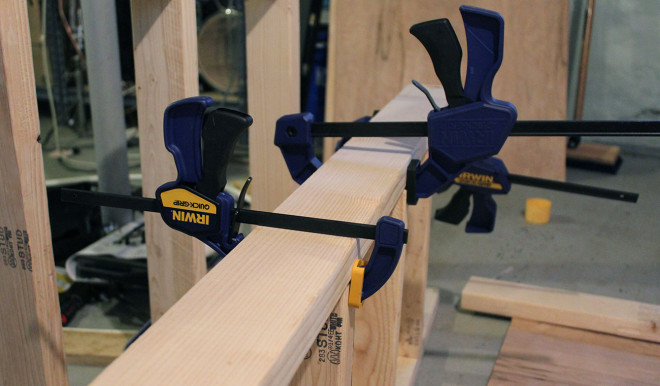
I learned this trick halfway through the project, so learn from me before the project. You’ll be able to get the job done without clamps or a second set of hands, but it certainly won’t be as easy or pleasant. The clamps hold things in place so the pieces don’t shift when you try to drill them together.
—
5. Countersink before you drill in the wood screws

Wood screws have conical shaped heads. Countersinking is pre-drilling the two pieces of wood you are screwing together and creating a pre-made cone that will fit nice and snuggly around the wooden screw head. There are a number of ways that you can countersink, but I used a countersink drill bit. The countersink drill bit created a pilot hole as well at the conical shape for the screw head to fit into.
—
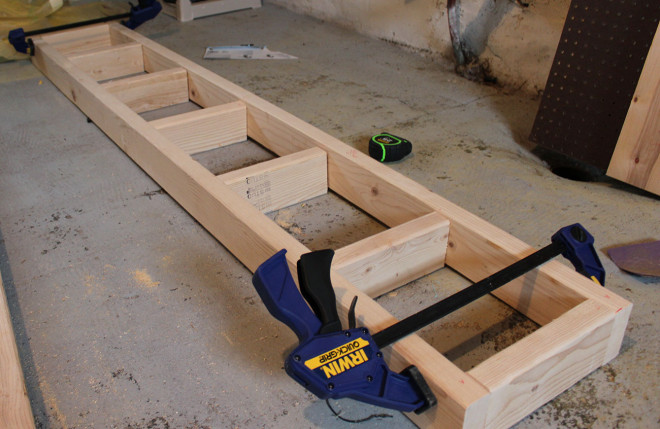
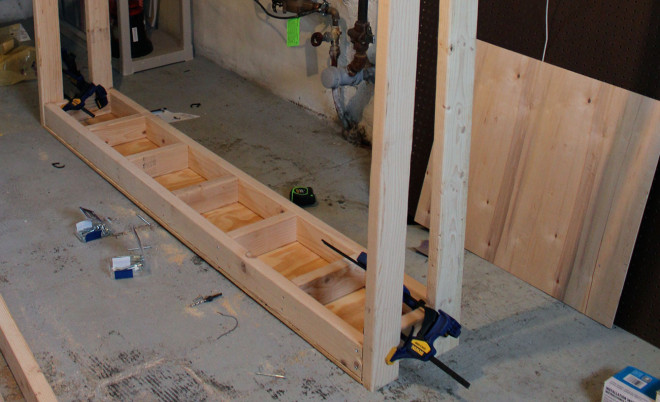
6. Assemble the table top and shelves first

Once you have all pieces cut, you’re going to start putting together the table top and the shelf underneath the table.
—
7. Turn the top over and start to attach the legs
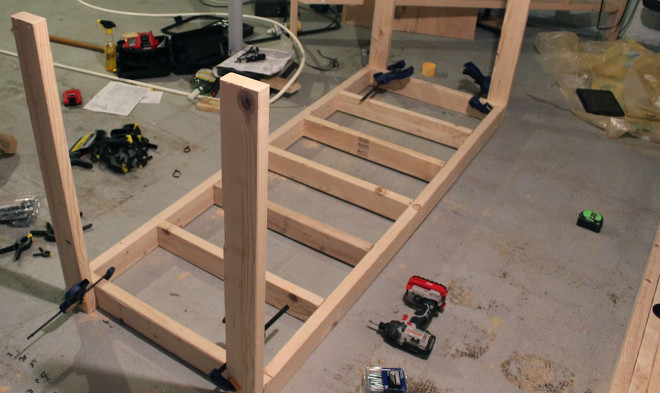
Once you have both the workbench top and the bottom shelf skeletons put together, you’ll start to put the legs on. Not the placement of the legs should be on the face of the long sides of the workbench.
—
8. Don’t do what I did and attach the legs in the wrong spot
As I said at the beginning of this post, plan and plan and plan again. And the read the directions properly. I ended up attaching the legs on the short sides of the workbench top instead of on the long sides. This resulted in an amount of rework. Don’t do what I did!
—
9. Flip the workbench over and attach the bottom shelf
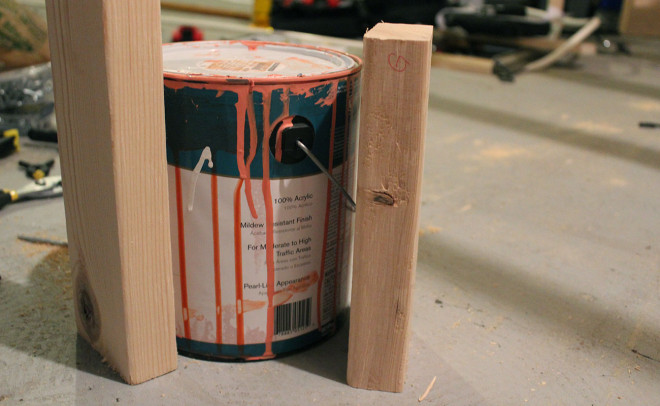
The directions for the workbench from Family Handyman suggest using paint cans to hold up the shelf while you attach it to the legs. My basement floor is a bit uneven, so I decided to use some of the small pieces that will be used for the top shelf. They are roughly the same height as a paint can and I was able to clamp them to the legs to be sure that each corner was going to be at the same height on each leg.
—
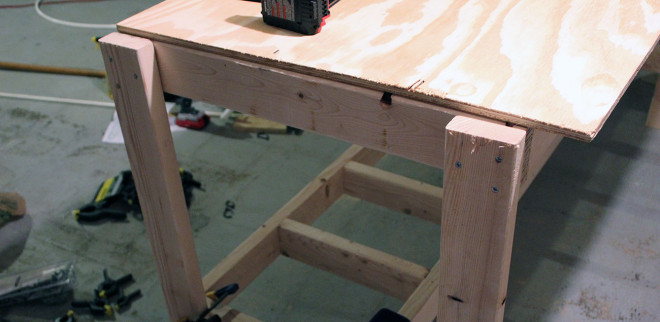
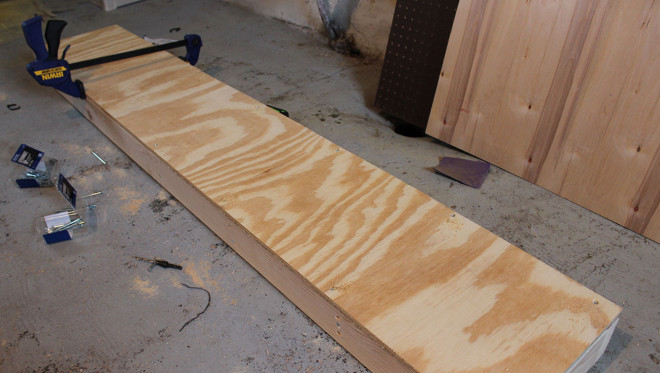
10. Attach the workbench top and the top to the bottom shelf
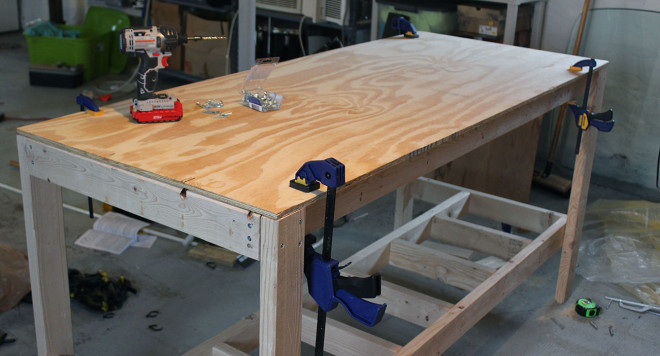
Using your clamps, attach the plywood to the table skeleton. You’re going to use the 1.5 inch screws for this part of the job. Make sure you have the B side up, which will have less knots and markings than the C side. It should also feel slightly smoother.
—
11. Assemble the skeleton for the top shelf
After attaching the workbench and bottom shelf plywood tops, start putting together what will become the top shelf. If you don’t want to have a top shelf and you just want the base, you can skip this step and jump right to sanding.
—
12. Attach the top of the shelf
Like you did with the workbench top and the top of the bottom shelf, attach the plywood to the top of the top shelf. Again, don’t forget to have the nicer side of the plywood facing up.
—
13. Sand, sand, sand the tops!
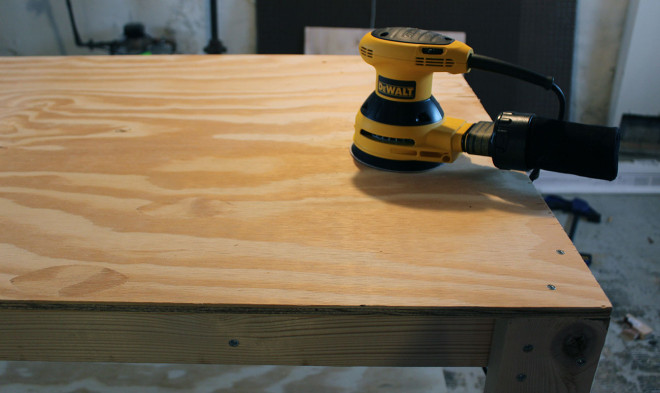
Now that you have the tops assembled on the workbench, bottom shelf and top shelf, get our your sander and start going. For each surface, I sanded with 80, 150 and 220 grit sand paper. This left me with a smooth surface that I can touch without fear of splinters.
—
14. Attach long beams to the top shelf
The top shelf is held up by four long beams. Attach them on the short side of the shelf.
—
15. Flip top shelf over and attach to the base of the workbench

Turn the shelf over and secure to the base of the workbench. Try to get the beams as level as you can.
—
16. Attach supports along the length of the workbench

You’ll attach three beams across the length of the workbench. One at the top, one in the middle and one at the bottom. This helps give the structure integrity.
—
17. Attach your optional accessories
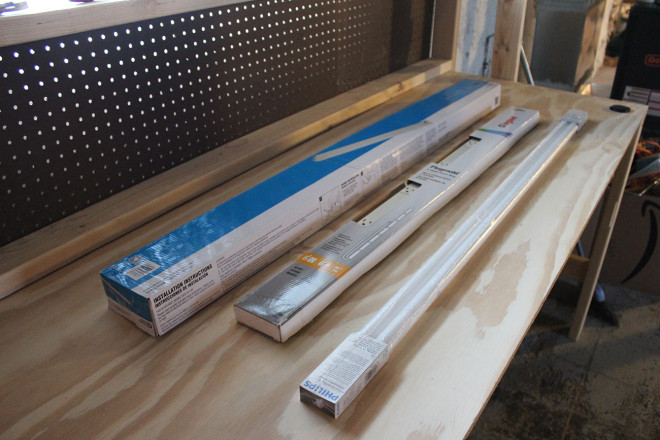
To pimp out my workbench, I attached pegboard on the back, added a workbench overhead light and attached a power strip so that I always have a couple of electrical outlets handy.
—
18. Voila! Fill it up with stuff!

Now that you’re done, it’s time to fill it up with stuff!
The Skinny on Building a Workbench
Costs

The article that I used to guide my shopping, cut and steps suggested that the workbench would cost less than $50 to build. In working on this project, that turned out to be a bit of an exaggeration on their part. A sheet of plywood alone costs $30-$40! My costs were as follows:
Materials:
- BC 4’x8′ Plywood: $37
- 15 2x4s: $40
- 3″ wood screws: $30
- 1.5″ wood screws: $8
Total Materials Cost: $115
Tools & Safety Gear:
- Miter Saw: $120 (Used rewards points)
- Safety Glasses: $10
- Earplugs (Box of 7): $3
- Countersink Drill Bit Kit: $25
- Orbital Sander: $75 (Used rewards points)
- Sanding Discs: $32 (Used rewards points)
- Clamps: $35
Total Tools & Safety Gear Cost: $300 (minus $227 purchased with points)
Optional Accessories:
- Peg Board (2’x4′ and 4’x4′): $14
- Shop Lamp: $20
- 2 Flourescent Bulbs: $10
- Power Strip: $46
Optional Accessories Cost: $90
So, overall, I spent around $278 on the workbench materials, tools, and accessories, plus an additional $227 was covered by points that I had on Amazon. That certainly added up quickly! I had a few supplies on hand, such as the power driver, tape measure and pencil. Other than that, I had to purchase everything else. The bad news is that $278 to complete a project, or even $115 for just the materials, is a LOT more than the advertised $50. The good news is that the bulk of my purchases will be able to be used again. Nearly all of the items under tools and safety gear will be able to be used again and again. So while the startup costs for my bench were high, I won’t have to repurchase those for my next project.
If you’re looking to build a workbench, but don’t want to spend nearly $278, some of these tips might help:
- Adjust the design of the workbench; the top shelf is nice to have, but potentially not necessary
- Avoid purchasing new tools by borrowing from friends or using what you have on hand
- Limit the number of add-ons that you put on your bench; you can always add them on later
Time

I worked on the workbench over the course of two days one weekend. My mishap with attaching the legs on the wrong side of the workbench top set me back at least 2-3 hours (removing screws is hard, y’all!). Expect this project to take between 8 – 12 hours. That includes sourcing materials and assembling. I worked on the majority of the project solo, so having someone help you may help reduce the amount of time to completion. You could be assembling one thing while they work on another.
Skill

This wasn’t the most difficult project in the world, but it did involve some skill. You need to use a couple of power tools and have some precision when cutting and assembling the workbench. However, it’s not the most technical project there is. For that reason, I rate this project a 2 of 4 in terms of skill needed.
Final Thoughts on Building a Workbench
So there you have it! Now you know how to build a workbench. Overall, I think this was a good project. Once I settled on what design I wanted for the workbench, it was a fairly straightforward project to complete. As always, there were a few bumps along the way, but I was still able to complete the project over the course of one weekend.